Liên kết
Diễn đàn tin hoc
Popular Posts
-
Adobe Photoshop CS6 là phần mềm tót vời cho việc thiết kế và xử lý hình ảnh. Adobe Photoshop CS6 cung cấp hết thảy các tính năng phối ghé...
-
Phải nói là trong thể loại game đua xe mình rất khoái Need for Speed: Hot Pursuit vì cấu hình về gameplay rất hay, nó cho mình cảm giác nh...
-
Anh em làm như hướng dẫn và chia sẻ để google index nhá. http://www.biometrics.gov/LeavingSite.aspx?url=http://congdongtinhoc.net http:/...
-
Khi các bạn thiết kế xong website, để đưa website lên top google thì phải mất thời gian để thực hiện tối ưu hóa on-page và off-page và ...
-
Theo dự thảo, hệ thống các môn học của chương trình giáo dục phổ thông được chia thành các môn học bắt buộc, môn học bắt buộc có phân hóa, m...
-
Sinh viên hỏi Giáo sư John Vũ: “Em muốn trở thành nhà khởi nghiệp và bắt đầu công ty của em thay vì phí hoài thời gian ở đại học. Em cần lời...
-
Dự kiến dự thảo chương trình giáo dục phổ thông tổng thể sẽ được công bố rộng rãi vào cuối tháng 3 hoặc đầu tháng 4 để lấy ý kiến dư luận tr...
-
( Danh sách Website 63 Tỉnh/Thành phố ) - Tỉnh hoặc thành phố trực thuộc trung ương là cấp hành chính địa phương cao nhất ở Việt Nam, trong ...
-
Matlab R2016a Full Crack – công cụ thiết kế lập trình, Download Matlap R2016a Crack mới nhất tại Topchiase.com Matlab R2016a Full Crack M...
Home » Thủ thuật
Upload file JS lên host Google Drive và thêm nút chia sẻ
Thứ Năm, 11 tháng 8, 2016
1/ Các bước upload file Css và Javascripts lên Google Drive
Truy cập vào địa chỉ của dịch vụ Google Drive https://drive.google.com/
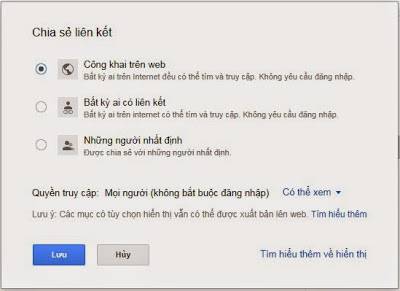
Các bạn upload file chia sẻ để cài đặt và chuyển sang chế độ public mới có thể sử dụng được.
Các bạn click vào file cần sử dụng và copy lại địa chỉ của file trên trình duyệt.
Mặc định đường dẫn (link) có dạng như sau:
Với file Js
Đăng nhập vào blogger rồi chọn Mẫu >> Chỉnh sửa HTML >> Tìm tới vị trí muốn hiển thị rồi thêm vào đoạn code như bên dưới:
Tags:
Thủ thuật
Truy cập vào địa chỉ của dịch vụ Google Drive https://drive.google.com/
Các bạn upload file chia sẻ để cài đặt và chuyển sang chế độ public mới có thể sử dụng được.
 |
| Chia sẻ liên kết |
 |
| Copy địa chỉ liên kết |
https://docs.google.com/file/d/0B_3VCSudZIUsUVhGbjhJLXplY0k/edit
Để có thể sử dụng file Js và Css mà ta đã upload cho blogspot, ta sửa lại đường dẫn trên thành:
https://googledrive.com/host/0B_3VCSudZIUsUVhGbjhJLXplY0k
Cú pháp khai báo khi sử dụng trong codeVới file Js
<script src="https://googledrive.com/host/0B_3VCSudZIUsUVhGbjhJLXplY0k" type="text/javascript"></script>
Với file Css<link href="https://googledrive.com/host/0B_3VCSudZIUsUVhGbjhJLXplY0k" rel="stylesheet" type="text/css"></link>
2/ Hướng dẫn thêm nút chia sẻ của nhiều mạng xã hội cho blogspotĐăng nhập vào blogger rồi chọn Mẫu >> Chỉnh sửa HTML >> Tìm tới vị trí muốn hiển thị rồi thêm vào đoạn code như bên dưới:
<!-- AddThis Button BEGIN --> <div class="addthis_toolbox addthis_default_style "> <a class="addthis_button_facebook_like" fb:like:layout="button_count"></a> <a class="addthis_button_tweet"></a> <a class="addthis_button_pinterest_pinit" pi:pinit:layout="horizontal"></a> <a class="addthis_counter addthis_pill_style"></a> </div> <script type="text/javascript" src="//s7.addthis.com/js/300/addthis_widget.js#pubid=xa-5254127c1833f872"></script> <!-- AddThis Button END -->
Nguồn: tổng hợp


Comments[ 0 ]
Đăng nhận xét